
Warsaw 16.03.2007r.
OPC_XLS60 VER. 1.2
MANUAL
TIGER-SOFT
UL. Wiazana 28B
04-680 Warszawa
tel./fax (0-22) 615-89-84
e-mail: tiger-soft@tiger-soft.com.pl
Table of contents
1) Introduction
2) Installing the I/O driver
3) Software registration
4) Configuring the OPC_XLS60
5) Configuring a Honeywell BMS (OPC client)
6) Starting and stopping the OPC_XLS60
The OPC_XLS60 ver. 1.2 is a communication driver which allows to connect BMS system, like Honeywell EBI or SymmetrE with a fire protection system XLS60e and XLS50e. The connection is set between computer with BMS system and its serial port (RS232) and communication module in the Honeywell central unit with RS232 or RS485.
Basis features of OPC_XLS60 are:
Run OPC_XLS60_INSTALACJA.EXE.Installation software will put OPC_XLS60 files into the default C:\Program Files\TIGER_SOFT\OPC_XLS60_1_1 directory or another directory chosen by the user. Shortcuts to the manual and registration software exist in the group OPC_XLS60 ver. 1.2 (access from the Start menu). The driver is installed as a service.
OPC_XLS60 should be registered after installation using TIGER-SOFT internet service. REJESTRACJA PROGRAMU from OPC_XLS60 ver. 1.2 group should be started first. This program generates file gen_lic.lic and saves it in the main driver directory. Then you have to connect to http://www.tiger-soft.com.pl/Rejestracja/rejestracja.html, fill the form and receive the registration code. This code should be put to the editable field in the REJESTRACJA PROGRAMU. Press OK to finish registration process.
The file - Konfiguracja.oxl is used for the driver configuration. It exists in the same directory like the OPC_XLS60.exe. An example of the file is presented below.
# OPC_XLS60 - configuration program
# KANAL - channel number 1-8
# AKTYWNY - activity of the channel
# CENTRALA - fire protection unit number
# LINIE - lines numbers, separated by commas
# COM parameters
# NR_COM from the range 1-99
# SZYBKOSC [bits/s]. Possible values: 9600,14400,19200,38400,57600,115200
# PARZYSTOSC Parity N-None,E-Even,O-Odd
# TIMEOUT [s].Possible values from the range 1-9999 [s]
KANAL=1
AKTYWNY=TAK
CENTRALA=1
LINIE=1,2
NR_COM=1
SZYBKOSC=9600
PARZYSTOSC=N
TIMEOUT=10
KANAL=2
AKTYWNY=NIE
CENTRALA=2
LINIE=1
NR_COM=2
SZYBKOSC=9600
PARZYSTOSC=N
TIMEOUT=10
KANAL=3
AKTYWNY=NIE
CENTRALA=3
LINIE=1
NR_COM=3
SZYBKOSC=9600
PARZYSTOSC=N
TIMEOUT=10
KANAL=4
AKTYWNY=NIE
CENTRALA=4
LINIE=1
NR_COM=4
SZYBKOSC=9600
PARZYSTOSC=N
TIMEOUT=10
KANAL=5
AKTYWNY=NIE
CENTRALA=5
LINIE=1
NR_COM=5
SZYBKOSC=9600
PARZYSTOSC=N
TIMEOUT=10
KANAL=6
AKTYWNY=NIE
CENTRALA=6
LINIE=1
NR_COM=6
SZYBKOSC=9600
PARZYSTOSC=N
TIMEOUT=10
KANAL=7
AKTYWNY=NIE
CENTRALA=7
LINIE=1
NR_COM=7
SZYBKOSC=9600
PARZYSTOSC=N
TIMEOUT=10
KANAL=8
AKTYWNY=NIE
CENTRALA=8
LINIE=1
NR_COM=8
SZYBKOSC=9600
PARZYSTOSC=N
TIMEOUT=10
5)Configuring a Honeywell BMS (OPC client)
OPC_XLS60 is an OPC server. Every software that can be an OPC client should work fine with OPC_XLS60. The OPC client should read data from the cache synchronously. Configuration for Honeywell software should be done in the following way:
a) Creating the channel using Quick Builder.(Img.1).
The value of Background Scan Period should be taken from the range 5-15s. It depends from the amount of points. Prog Id is TS.OPC_XLS60.
Img.1.
b) Creating the controller (Img.2).
Enable Background Scan.
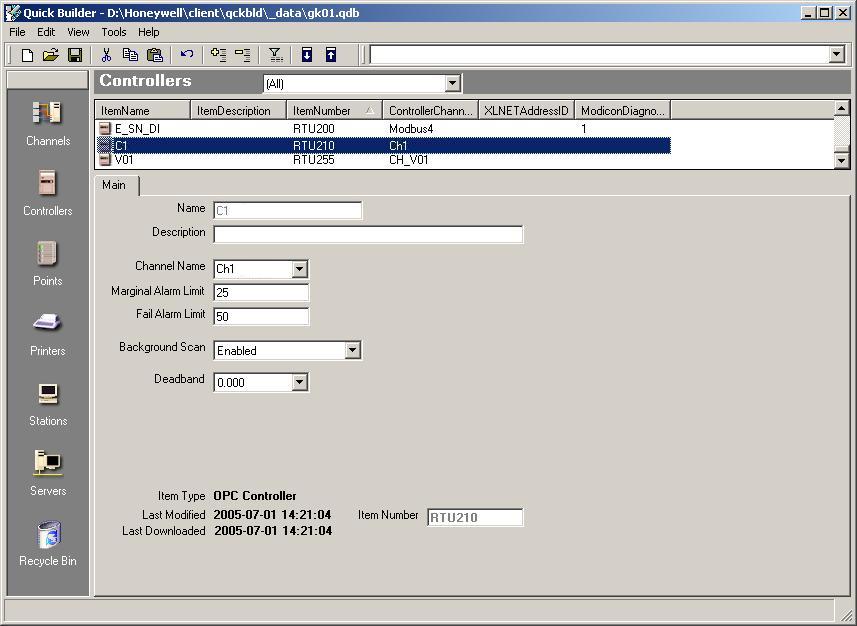
Img.2.
c) Creating the area (Img. 3).
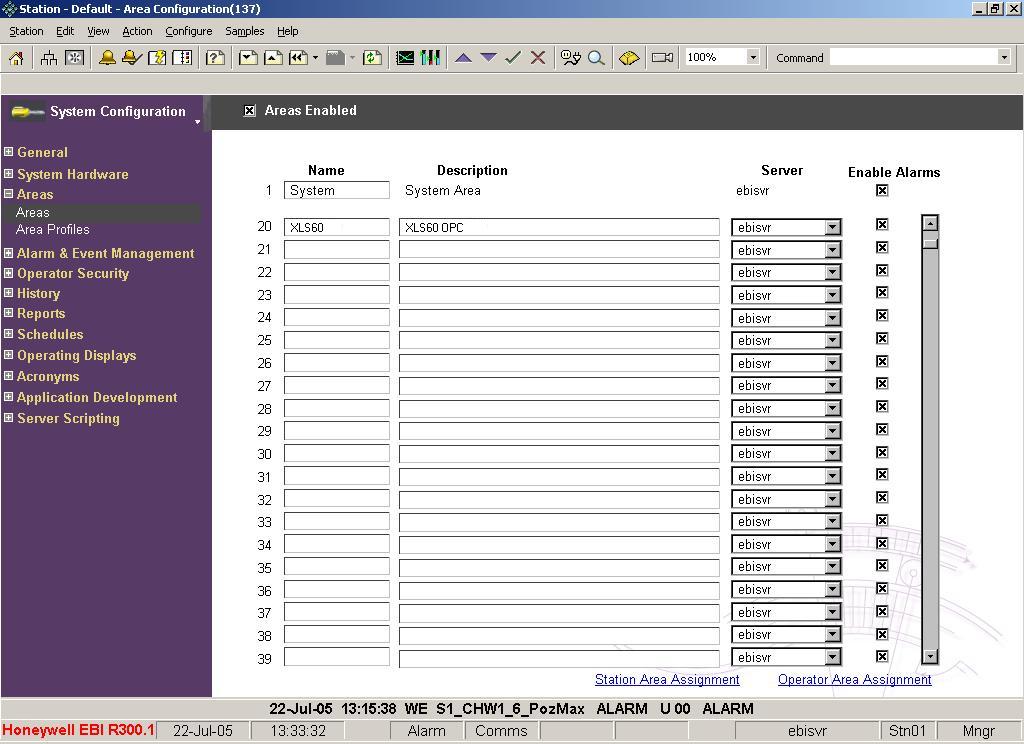
Img.3.
d) Creating points.
PV Scan Period must be set to 0 for each point. ItemID(Location) can be set like this:
|
ItemID |
Description |
Returned or set values |
| KkkKomunikacja |
Presents the status of the communication between OPC_XLS60 and XLS60 or XLS50 unit, where kk - channel number; |
Value 1 means that communication is OK, 0 there is no communication. |
| KkkCccLllAaaBb |
Shows the status of an element, where kk - channel number; cc - unit number; ll - line number; aa - element address; b-bit Examples: K1C1L1A101B1, reads information about fire alarm from element number 101, line 1, unit number 1, which is connected to channel number 1. K1C1L1A101B6, reads information about fault from element number 101, line 1, unit number 1, which is connected to channel number 1.
|
B0 - input disabled |
| KkkCccLllAaaS |
Shows the status of an element, where kk - channel number; cc - unit number; ll - line number; aa - element address; Examples: K1C1L1A101S, reads information about fire alarm from element number 101, line 1, unit number 1, which is connected to channel number 1.
|
0 - Normal |
| KkkCccLllAaaA |
Shows the analogue value of an element, where kk - channel number; cc - unit number; ll - line number; aa - element address; Examples: K1C1L1A1A, reads information about the analog value of the element number 1 from line number 1, unit number 1, which is connected to the channel number 1.
|
Analogue value of an element. |
| KkkCccLllAaaE |
Allows to send on/off command to an element, where kk - channel number; cc - unit number; ll - line number; aa - element address; Example: Writing to the point K1C1L1A1E value 1 will switch off the element number 1 from line number 1, unit number 1, which is connected to the channel number 1. |
Commands |
| KkkCccZzzE |
Allows to send on/off command to a zone, where kk - channel number; cc - unit address; zz - zone number; Example: Writing to the point K1C1Z1E value 1 will switch off the zone number 1, unit number 1, which is connected to the channel number 1. |
Commands |
| KkkBroadcast |
Allows to send broadcast command to all units in the channel, where kk - channel number; Example: K1Broadcast allows to send commands to units from channel number 1. |
Commands |
Following images (Img.4,Img.5) show examples of configured points.
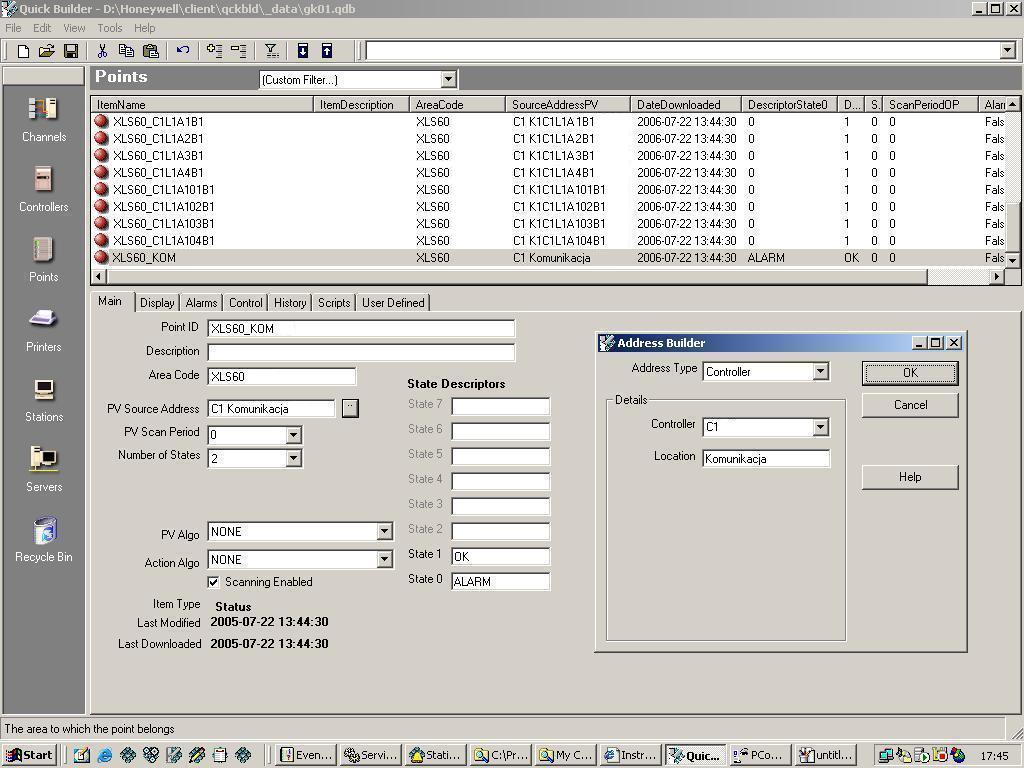
Img.4.

Img.5.
Img.6 presents a proper communication between EBI software and OPC_XLS60. It does not mean that communication between OPC_XLS60 and XLS60 is fine. This status is shown by Komunikacja.

Img.6.
6) Starting and stopping the OPC_XLS60
The driver can be run from the service manager on Windows NT/2000/XP. Second way is to use command line with commands: OPC_XLS60 -s for starting and OPC_XLS60 -z, for stopping it. The service OPC_XLS60 can be also configured to start automatically after operating system is started.
WARNING!!! If the driver is installed on Windows XP or Windows 2003 Server additional parameters have to be set. These parameters concern security of the service and DCOM component. In order to do it dcomcnfg.exe should be run. User of the service should be chosen from computer users (for example system administrator).Interactive user(identity) should be set for DCOM TIGER-SOFT OPC_XLS60.